Rotina de backup do Banco de dados (WordPress)
Rotina de backup do Bando de dados.
(Tópico retirado da seção de documentação do WordPress).
Using phpMyAdmin
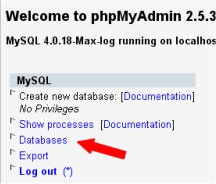
1- Log into phpMyAdmin on your server
2- From the main login screen, select ‘Databases’
3- Now click the name of your database – or your WordPress database if you have several databases.
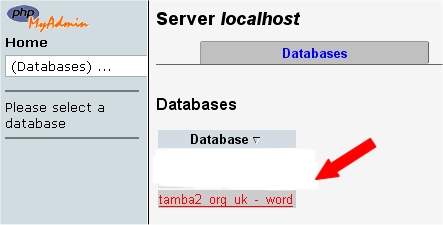
4- The next screen will show you all the tables inside your WordPress database.
Ignore those, and click the ‘Export’ tab on the top set of tabs.

5- Look at the left box at the top of the Export section. All the tables in the database you selected are in that box.
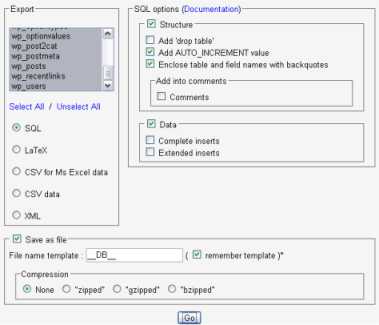
– If you have other programs that use the database, then choose only those tables that correspond to your wordpress install. They will be the ones with that start with “wp_” or whatever ‘table_prefix’ you specified in your ‘wp-config.php’ file.
– If you only have your WordPress blog installed, in the left column, click ‘Select All’.
6- Ensure that the SQL button is selected too.
– The SQL section
– Tick the following boxes: Structure, ‘Add DROP TABLE’, ‘Add AUTO_INCREMENT’ and ‘Enclose table and field names with backquotes’
7- The DATA section
– Leave the boxes inside this section unticked, but make sure to keep the checkbox next to the “DATA” heading checked.
8- Tick the ‘Save as file’ option, and leave the template name alone.
For now, select ‘None’ for compression.
9- Now click ‘Go’ and you should be prompted for a file to download. Save the file to your computer.

Depending on the database size, this may take a few moments.
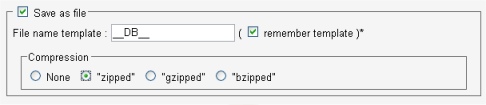
10- Once that download is complete, check the ‘zipped’ option, click ‘Go’, and download the next file.
If you wanted, you could download a backup in each of the compression formats. Your choice.
11- You have now backed up your database.
Remember – you have NOT backed up the files and folders – such as images – but all your posts and comments are now safe.
Using Straight MySQL Code
phpMyAdmin can not handle large databases so using straight MySQL code will help.
1. Change your directory to the directory you want to dump things to:
user@linux:~> cd files/blog
2. Use mysqldump (man mysqldump is available):
user@linux:~/files/blog> mysqldump –add-drop-table -h mysqlhostserver
-u mysqlusername -p databasename (tablename tablename tablename) | bzip2
-c > blog.bak.sql.bz2
Enter password: (enter your mysql password)
user@linux~/files/blog>
Example:
mysqldump –add-drop-table -h db01.example.net -u dbocodex -p dbwp | bzip2 -c > blog.bak.sql.bz2
Enter password: my-password
user@linux~/files/blog>
The bzip2 -c after the | (pipe) means the backup is compressed on the fly. It does in one line the same thing that these two commands do:
mysqldump –add-drop-table -h db01.example.net -u dbocodex -p dbwp > blog.bak.sql
bzip2 blog.bak.sql


